Showing posts with label Dimensions Gold. Show all posts

Sunday, July 5, 2015

Framing the Geisha

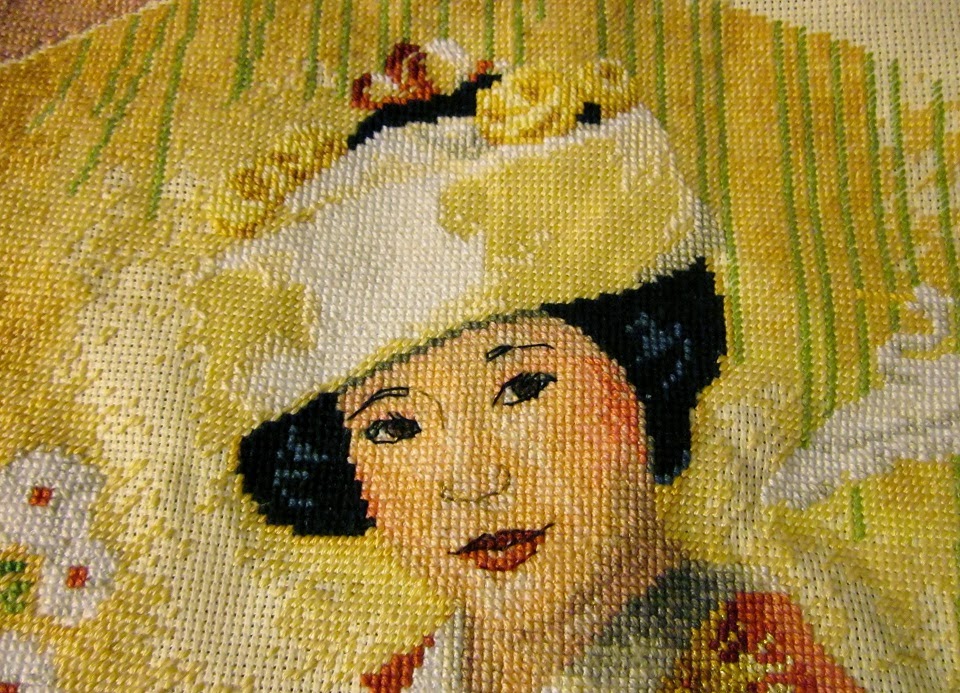
No, I didn't commit a crime and frame a geisha. I wouldn't do that. But I am definitely the kind of person willing and able to frame the geisha I stitched and finished this year. It turned out pretty, although I'm not at all happy with the framing part. Too much mat, not enough fabric. It is lashed to the backing, but I would have preferred thinner mats had I but known they would take up so much space. I'll leave it for now, but the next time I buy a frame for a 5 x 7, I'll use one of my fabrics and not the kit fabric so I will end up with thinner mats and more space to lash the fabric to the frame. It makes such a difference.

And now for the reveal.


It turned out nicely, but not nicely enough. I think a lighter green top mat (and also thinner) with the gold bamboo frame next time. In the meantime, it will hang above my bed with all the ladies with fans will eventually reside. This is a Dimensions Gold kit, the 5 x 7 version, but a very nice kit.

Don't forget to click on the picture to make it bigger. It is quite beautiful. I even managed the bullion stitches that make up the hair ornament above her ear. The gold is pretty too in the back stitching details, subtle but not too subtle. 

Happy stitching. And may all your framing turn out the way you want them.


Tuesday, January 27, 2015

Relaxing stitching

I've been fairly busy with the new house, but I have taken the time to relax. My favorite way to relax is to cross stitch. Joadoor's Swan and Lanarte's Eastern Beauty. I do think of her as an Arab beauty since she is obviously Middle Eastern and the Middle East reminds me of Arabs. I would daresay a Persian Beauty. I'm also working on 2 smaller pieces, Dimensions Gold Geisha and Lanarte called Arabian Woman, another of Lanarte's Cultures Collection. I would love to own and stitch them all. They are quite fascinating and prove Marco Polo's point when he told Kubla Khan that every country on the world boasts women who are beautiful in their own way when asked which country had the most beautiful women.

At any rate, here is the nearly completed Eastern Beauty from Lanarte and it is a haunting piece. I'll post the finished piece once I've stitched all the remaining bits and bobs and added the metallic silver threads. Don't forget to click on the picture to make it bigger.

Happy stitching.


Tuesday, January 28, 2014

Backstitching the Bride

I thought I'd share how far I've come in the backstitching for the Japanese Maiden and how much of a difference it makes.

What looked muddy and off color to me when I stitched it now looks much more beautiful with the back stitching. I am amazed at how she is turning out and how lovely the gold threaded stitches look.

The backstitching makes such a difference. The bride is much more prominent against the background and the cranes on her kimono are more vibrant as well.

It is difficult to see the gleam of the gold thread in the designs on the hat. Looks much better in person. Maybe when it is framed it will be more obvious in a photo, but I think I'll have to get a special lens and better camera skills to make that possible. Trust me; it looks beautiful in person.

I should finish by February and I am very pleased with the work so far. A few more days of stitching and she will be a fait accompli. That's a good thing.

Don't forget to click on the pictures to see them up close. Happy stitching

Sunday, January 26, 2014

Japanese Maiden - Only Back Stitching Left

I reached an important goal last night. I finished stitching the Japanese Maiden by Dimensions Gold. I had just enough of the floss to complete the last part of the border, and I was sweating it. The stitching is all finished. All that remains is the back stitching and that will take almost as long as stitching the whole piece -- or at least that is the way it feels. 

Every stitch is in place and I'm ready to add the definition that comes with back stitching so the flowers, birds, leaves, and details of this bride's clothes will pop. I'm really done with the stitching. I finished. 

This is where I was last weekend with just the upper corner to do.

Here is where I stopped last night after taking out an extra row of stitching and cleaning up the tag ends on the back. She is done.

When I begin a project, I am always excited about the journey to come. At about the mid point, I feel like I'll never be done, especially with large projects like this. Like a pregnant woman who is close to her due date, I'm ready for it all to be over, the last stitch in place and the job finished. I look back over everything I've accomplished and get that warm glow of accomplishment that comes before the inevitable slide into the place where I realize I still have all that back stitching to do. It's a little like a roller coaster ride, with ups and downs and sideways bumps and careening around the tight curves, and the results are almost always good.

I did take a little while yesterday to stitch a birthday card for a friend, but came right back determined to finish -- and I did.

Whatever the ride stitching is for you, it's always worth it. Happy stitching.


Monday, January 20, 2014

Finishes: Big and Small

I didn't plan on posting any more pictures of the Japanese Maiden until she was all stitched, but I couldn't resist. After a couple weekends of stitching, I finally have the maiden finished. Well, except for 2 stitches in her ring. I discovered she is a Japanese bride. She is quite lovely and I'm proud of her. All that is left is the outside border and most of the back stitching and then off to the framers. I did wonder about leaving off the outside border and having her framed as a round, but that didn't occur to me until after I had stitched the left side of the border. Too late and I'm not about to rip it all out either.

A few more stitches to go.

She's all there now, and so is some of the right hand border. She is quite beautiful and I'm proud of myself. She's getting there.

It always seems such a surprise when I get to the point where a project is nearly done. I remember the blank canvas and the first few stitches and how long a road it looks from that point, but I always get there. She is quite simply a marvel and I stitched it all.

Happy stitching. From small beginnings come big finishes -- and the biggest finish is yet to come.

Don't forget to click on the pictures to make them bigger.


Monday, January 13, 2014

Returning to Japan

After all the Christmas madness, I decided to return to an old friend. That is what Dimensions Gold Japanese Maiden seems like to me. I have stitched on her off and on over the past year and it sometimes seems like so much longer. Doesn't matter because I got into the groove quickly.

This is where I was when I left off in September. It doesn't seem like so much now.

Here is the latest progress. There is so much more there there. I'm pleased with what a couple of days will do.

The obligatory close-up of what was actually done.

Close-up of the face. I decided to back stitch the face a little. Took me three tries to get the mouth right, but I'm finally satisfied with it. I may have to redo the right eyebrow, but she looks so different with the lines stitched in. Gives her more personality and brings together the different elements and colors of the face.

I often break up long works by doing something else, lately a small project like the Gingerbread and Jingle mice, but also by going back to other longer works. I had to rip out a couple of sections, other than the back stitching around the mouth, but I'm pleased with the results and that is all that matters.

In the meantime, happy stitching.


Sunday, December 8, 2013

Stockings ready to hang

Since I got all the pieces for finishing my grandchildren's stockings yesterday, I got busy, and I do mean busy. I haven't sewn anything this ambitious by hand in ages, so I decided do sew all three stockings by hand. It took all day, but the results are nice.

Here are Addy and Tori's stockings put together without the lining and hanger. I saw some metal snowflakes and decided to add them to the design. I used winter cream felt for the backing.

 Jordan's stocking is put together with its blue felt backing.

I went with a plain white cotton lining last year, but I had some christmasy material that I got by mistake when I ordered quilted fabric. I should have checked because the fabric should have been pre-quilted and not ready for quilting. Never one to waste anything, I used it for the lining this year and for a bit of color at the top of Addy and Tori's stockings.

I made a hanger out of the cross stitch material for Addy's stocking.

The lining fabric was so pretty I decided to use it to make the hanger for Tori's stocking.

A braided yarn hanger is all that I added to Jordan's stocking to make it ready to hang. The lining is hidden inside waiting to be filled by Santa Christmas Eve.

All three stockings and linings were sewn by hand. I can still do that - the sewing I mean. It would have been faster on the sewing machine, but I decided to put a little extra time and love into these stockings. They're done and ready for mailing now. The kids won't see them until Christmas morning, but hopefully their parents will like what they see.

Don't forget to click on the pictures to see the expanded view. Happy stitching.


Tuesday, October 22, 2013

On an Asian Roll

Since I was already here and couldn't get the previous post to give me any more space, I'm putting the update for the Japanese Maiden here.

This is where I stopped to work on Xmas stockings. I love this design and I can't wait until it's finished, framed, and ready to hang. I'm keeping this one for myself.


Here's a closeup of the new details. Still have the outside to work on, but it's getting there and I'm really happy with what is coming from the threads. I'm so glad I decided to do this one. It's beautiful.


Happy stitching.

FInding zombies for Xmas

I've been working on the stocking with the ornaments that I plan to use for zombies. I don't like the zombie I'm working on because it seems too cartoonish and doesn't fit the style of the background. The other stocking will be easier since I have an idea that will work. Different pattern but a marriage made in zombie hell for sure. That will work. This one, not so much, but I may have an idea of how to fix the problem -- at least the problem in my estimation.

Here we go: 


Here's what I have so far with one of the ornaments partially filled in.


This is Miss Zombie 2013. I'm adapting a pattern I already had and I'm not sure whether I like it or not.


Ornament #2 is ready for its zombie, but I think that one will be better. I have an idea that just might work. I'm waiting on the specialty floss to make it happen.

 Ornament #3 and it's the biggest one of all. This one will have to be special. I do love the overall design. I'm just not sure about the zombies.


Wednesday, October 16, 2013

HalloXmas Stocking

I pondered this idea for a while before I finally came up with a way to make it work. That is making a Xmas stocking with a zombie theme. I wanted something that was still Christmasy and adding zombie elements.

This is the first stocking and the way I worked around the problem. Xmas tree with large ornaments depicting acts of zombie horror. What could be better? I hope.

 I've begun the outside elements. More branches and ornament hangers will be added. Snowflakes will be stitched on and inside each lovely looking ornament will be some sort of zombie horror. The perfect marriage of horror and sweet. Don't you think?


I used one of Dimension Gold's stocking patterns for the basis of my Xmas theme. It's coming along nicely. I have deleted some of the elements obviously, like the inside of the ornaments, which were holiday scenes, and will add the scenes -- or decomposing body parts -- of my design. This was actually fun.

Still haven't decided which one of my evil ideas I'll use for the other HalloXmas stocking, but I'm getting there. I haven't drawn anything in years and I've never designed a cross stitch pattern from scratch. I'm doing it in stages so I don't get design lash. Like whiplash only messier.

Happy stitching.

Thursday, October 3, 2013

Moving Along with the Maiden

It has been a while since I posted anything, but especially since I updated my Japanese Maiden. Not here though because I've been stitching (and frogging) away. I'm amazed at how well it is coming, although I worry I won't have enough thread to finish, which is why I prefer buying patterns and using my own thread. DMC of course.

About 3/4 finished right now, not including back stitching, which will take a while since there are a lot of elements to outline. I am always surprised when the amorphous look of some elements become clearer and more beautiful as a simple dark thread is added around the outside and inside to create such pretty effects. 

That is all for today. I decided to leave details to the last. This is my last unfinished project waiting to be finished, but I have started another. Baba Yaga on her pestle in front of her house with its chicken legs with her broom and cat, although I always thought she used a mortar to drive herself along while she sat in her pestle. Details, details. 

Happy stitching. 

Sunday, August 11, 2013

Last Stocking Done

Well, after a very long night (I couldn't sleep), the stocking is done. As nice as it looks -- and I still have to cut it out, attach backing and hanger, and line it -- I am glad the project is over.

I don't know about you, but when a project seems to take forever, I get antsy. I want to move on to the next project. Here's the finished results.


There were more trees but I decided they didn't add all that much, so some of them are missing. I like a less cluttered landscape.

 
The cardinals now have eyes and grass sprang up over night, but not without a considerable effort on my part. Who knew grass could be so time consuming?


Those funny little dots beneath the bow and hanging over the pine cones and at the side are beads, fairly good sized gold glass beads. They add a bit of depth to offset the gold wire around the red ribbon and on the name.


 I wasn't happy with the name the first time around and not too happy this morning with the N, so it was time to remove the stitching and start over. I think I finally managed to get the lettering to look better, but not perfect. Well, it's not an exact science and materials handle differently when fatigue is part of the mix. I'm happy enough with it that I won't rip it out again.

I am finished. My grandson will get his stocking for Xmas and I hope he likes it.

Happy stitching

Monday, August 5, 2013

Stitching with Gold

I worked on the Xmas sled stocking this past weekend and actually got somewhere. I left in old stitches that will eventually be pulled so you can see the difference between using 4 stitches instead of the 2 listed, especially when working with the gold wire. The wire reminds me of DMC's gold filament wire, which I also bought and will be using on one of the Celtic group, Celtic Christmas.


 I began the lettering too far left and the letters look faint.


As you can see, the gold thread looks much more prominent here. I'm not happy about the single thread that holds the gold in place because I can see it. 


Here the couching on the top of the sled is much clearer and I like the curlicues that form off the leaves. Much still isn't done, but there a lot more done than what I started with over the weekend.


In this closeup, you can see the individual details better.


The pine boughs are all done here as are the pine cones and the leafy detail. The leaves are made by combining the gold filament wire and the floss. Seen in person, it glitters with just enough gold.


On the left hand side, geese fly by in the cold winter sky at dawn. There are no special gold threads here, just half and full crosses and back stitching in 2 colors: black and brown, to make the geese look like they're flying.


This is a closer view of the geese. The effect is like impressionist art, more effective from a distance.


This has been a complex project, but I am glad I tackled it and am close to finishing. All that is left is the gold couching on the ribbons, some trees, a bit of back stitching, and putting on the name, and then it's time to cut out the stocking, backing, and lining for the inside and stitch it all together. I'll attach a braided hanger I already made and set it aside for Xmas. I'm already anxious to begin on the next project and the one after that and the one after that.

There are plenty of frustrations and a lot of fun in cross stitching, but for me the payoff is giving the work away to someone who will appreciate it. It's no fun keeping it all to myself.

Happy stitching.

Tuesday, July 30, 2013

Slowly and surely


I began the odious task of back stitching, which I often call outlining. It's the same thing. Back stitching is the type of stitch used to outline features in cross stitch. As you can see, the cardinals look much more there, even without their French knot eyes.


I began my back stitching with the church, mostly because I wanted to know how it looked with the fence and railings and if it would be more there. The church and surrounding landscape is composed of half cross stitches and it does indeed look very much there.


As I began on the sled, I noticed that the lines would not be straight if I used shorter stitches and the longer stitches would be easier to snag, hence I decided to use long stitches and tack them down in a sort of hybrid couched/back stitched method. There are some unfinished pine branches on the right side of the sled and they look much less defined as the branches on the center of the sled. I'll do the ribbon last as that requires couching of the gold wire. Best to put the other stitches in first. (Click on the pictures to get a closer view.)

In the end -- and it's still a bit away from now since I don't have a lot of time to work on the stocking -- it's all about doing the best job possible. I think this is turning out to be quite pretty. I'm please with it -- so far.

That is all. Disperse.

Saturday, July 27, 2013

Getting there

There were times I thought I'd never get this one don. There are so many color changes: a couple stitches here and then a few more over there and then over there and over there with no discernible pattern to the stitches. That is what makes this stocking in particular a real bear to do. But here I am in the final stages, beginning the outlining and putting the name on the stocking. (click on picture for close-up)

The name is done by couching, running two gold wire threads around in the shape of letters and tacking them down with a coordinating color of floss. I don't mind couching when it's free form or even a little structured, but doing letters . . . not so much. 

Dimensions makes this particular pattern and they do include everything. A whole lot of gold wire for blending elements, couching, and outlining, and a less than adequate amount of floss for the rest of the project. Some colors are in short supply, which is why it is necessary to make the stitches perfect the first time. There is almost no room for error in this complex pattern. Dimensions provides sufficient beads and gold wire, but not enough thread in the colors that matter the most. I don't know about you, but I don't like substituting DMC (or Anchor or whatever brand you use) for the packaged thread. Colors within different dye lots can be very different, so imagine colors from a different company. You would have to have either a color chart from the company (preferably with actual thread and not just a photo) in order to get as close as possible, but don't count on getting a perfect match. The odds are not in your favor. 

I'm proud of what I've accomplished, in spite of the frustration, agony, and nearly chucking the whole thing, but then I hear my mother's voice telling me I never finish anything and I keep going. In fits and false starts at time, but the results are plain to see. I'm nearly done. 


The picture is lovely and will look even better once all the back stitching is finished, and there is a sense of pride in getting this one finished at last. I bought the kit from 123stitch.com and recommend them for their customer service. I would have preferred to have just the pattern and buying my own materials, but there is not that option with Dimensions, and especially not Dimensions Gold. I have found that Dimensions often miscalculates the materials, giving more than enough for some and not enough of more crucial threads. Still, it is a beautiful pattern and, aside from the fussy little stitch changes, not too difficult if you're a seasoned stitcher.

If you want to make this particular stocking, get your kits now. Dimensions also retired some kits sooner than others.

Happy stitching.